

replace an ac capacitor
The most common reported problem in an AC repair is a bad capacitor. Since the capacitors are cheap parts, they tend to fail very often.
Generally, capacitors can’t handle extreme weather so if you have a stretch of two-four days of really hot weather or a thunderstorm.
Then there’s a really good chance that your capacitor might fail. Capacitors are not that expensive and hard to get so it’s becomes really easy to replace them.
So In this article, I’ll take you through steps by step on How to replace an AC capacitor on the condenser unit and the furnace. This is not a very difficult process but you need to know and follow proper instructions before you put your hands on any capacitor.
What to choose between a run and dual run capacitor?
So first let’s discuss what’s the difference between these two capacitors. A run capacitor (single unit run) is used to power a single motor. It is mostly used in smaller HVAC systems. It has two terminals for the connections.
Now talking about the dual-run capacitor it a combination of two single-run capacitors. A dual-run capacitor can power dual motors and is used in larger HVAC systems. The dual-run capacitor has three HFC terminals (H= Hermetic Compressor/Herm, F= Fan, C= Common).
Selecting a new run capacitor may be more difficult than you anticipate. Since many capacitors resemble one another and it can be challenging to navigate the differences between them, browsing the options can be confusing: The definitions of Single and Dual MFD and VAC: What do they mean? Understanding these terms can help you choose the run capacitor that is most compatible with your system as you compare various run capacitors.
Dual vs. Single Capacitors
One of the most crucial things to consider when comparing the various run capacitors available is whether the item is a single unit run capacitor (often abbreviated "single" in product descriptions) or a dual run capacitor (often abbreviated "dual"). Make sure the type of run capacitor you buy matches the one you are replacing when you replace the one in your unit.
Smaller HVAC systems, like small air conditioners, are more frequently used to connect a single motor to a single unit run capacitor. Two capacitors are combined into one with a dual run capacitor. You can run two electric motors simultaneously with a dual run capacitor. Dual run capacitors are therefore perfect for larger HVAC systems, such as air conditioners and heat pumps with both fan and compressor motors.
So now you might be wondering where do both of these capacitors go in the AC unit. If you have a larger AC, the single run capacitor goes into the furnace’s blower motor. And the dual-run capacitor goes into the condenser unit outside.
How To Replace Your Capacitor At the Condenser Unit?
Step 1: Turn Off The Power
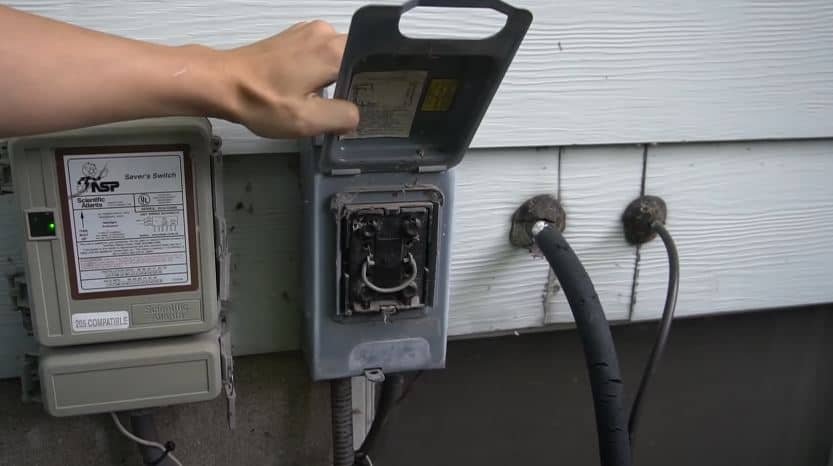
The first thing you have to do is Disconnect the main power supply of your Central AC. This is a crucial step you must never operate an AC while it’s connected to the power. Because you might end up getting shocked.
Step 2: Locate Your Capacitor in the Outside Condenser Unit

The second thing you need to do is locate your capacitor. If you’re operating for the first time then you need to find where your capacitor is located. So to locate your capacitor just follow your condenser’s power wire (the wire that connects to the Disconnect fuse section). If you’re completely lost and confused then just read the AC manual or search online where your capacitor is located.
Most of the capacitors are located at the side panel of the condenser unit. You just need to unscrew the side panel and you’ll be able to see the capacitor.
Step 3: Take Out The Old Capacitor and Discharge It
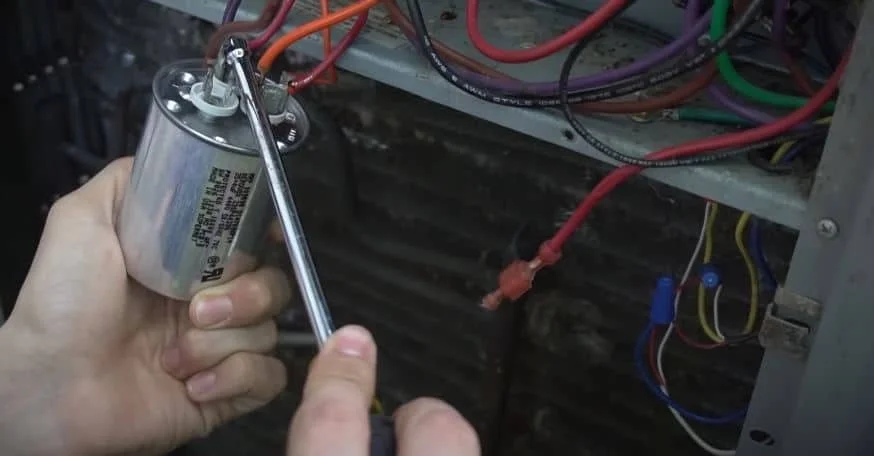
After opening the side panel you need to unscrew the old capacitor that is held by a metal strap.
Few things I would like you to know: capacitor stores charge inside them even after disconnecting the main power that how they work. You should always discharge a capacitor first then change the capacitor. Because if you touch the tines of the capacitor without discharging it then you might get shocked. It’ll not kill you but enough to hurt you.
So to discharge the capacitor you’ll need a screwdriver. First, touch the screwdriver from common to herm and then from common to fan. And you’re old capacitor is discharged and safe to touch.
Step 4: Change the old capacitor to a new one.

To change the old capacitor to a new one you just need to remove the wire one by one. First, you can take off the wires from the fan terminal of the old capacitor and place them into the new capacitor’s fan terminal.
Next, take off all the HERM wires from the old one and transfer them into the new one. At last, do the same with the common terminal. You don’t have to worry about which wire goes into which tine. Because all the tines are connected to one another. Just place the wire to the correct terminal.
One thing I would like to share that if your wire connector has become old and corroded then you must replace them with the new one. It’ll prevent any future damages or problems.
Step 5: Put the Capacitor Back in its place

Now after connecting all the wires from the old capacitor to the new one. You just need to place the capacitor back in its place. If your new capacitor is smaller or slimmer than your old one then you need to adjust the metal strap.
You can tighten the metal strap with a plier. After that close up and screw the side panels. And now you have successfully installed a new capacitor in your AC condenser.
How to properly hook the wires to the terminals of the capacitor?

So In a dual run capacitor at each terminal, there are two, three, or four tines where you connect your wiring. Since all of the tines are connected to one another at the terminal so it doesn’t matter which wire you place on which tine.
You just need to place the right wring in the right section (meaning place Herm wire in the Herm section of the capacitor and similarly do it with others).
Most of the time in dual run capacitors the common section will have 4 tines, the herm section will have 3 tines, and the fan terminal will have 1 or 2 tines.
Also, check out our Report on the Most common problems faced by an ac owner and their DIY solution.
How to Install a new Capacitor in the Furnace for the Blower Motor?
Step 1: Turn Off The Power Supply to the Furnace

furnace switch
First, you have to turn off the power supply to the furnace. You can either do it from the Power switch beside the furnace or you can turn off the main breaker if you don’t have a power switch nearby.
Step 2: Take Off Your Furnace Door
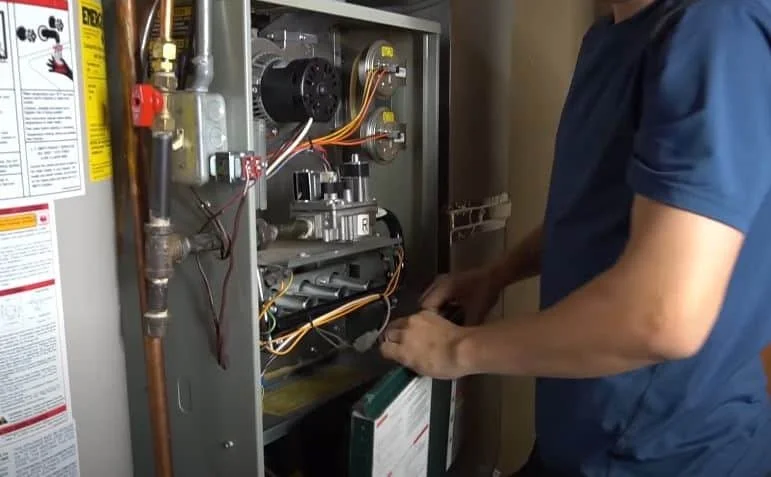
Now you need to remove the furnace door and at the bottom, you’ll see your capacitor mounted. On most furnaces, the capacitor will be mounted to the blower housing in the front. And if you're unlucky it'll be mounted in the back and unfortunately, the only way to get there most of the time is to pull the whole blower wheel housing out in order to access it.
Step 3: Unscrew the capacitor and take it out.

There’ll be a bracket where the capacitor is fitted. You’ll need to unscrew the bracket and take the capacitor out.
Step 4: Discharge the capacitor and replace it with the new one.

So after taking out the capacitor you’ll need to discharge it because it stores charge inside it. Just touch your screwdriver on both terminals of the capacitor and it’ll be discharged. Now take out both wires and transfer them to the new capacitor. It does not matter which wire goes to which terminal because it’s a single capacitor.
Step 5: Place the Capacitor Back and Close the Furnace door
Now what you have to do is just place the capacitor back to the bracket and screw it. Just close the furnace door one by one and finally, you have successfully installed a new capacitor.
Click Here To Check Why your AC is Not Cooling Enough?
How to test your old Capacitor?
https://youtu.be/KuUjkE1gEzg
For testing your capacitor you’ll need a meter that can measure microfarad. So to test your dual run capacitor you’ll need to first calculate the HERM rating.
Now place your multimeter’s black lead on the common and red on the HERM and give it a few seconds to read. Then it’ll show you some higher readings (read on your capacitor what’s the higher reading it’ll be HERM). If you see nothing on the meter then the capacitor is dead and if the number is low it close to it its end life.
Now to check for Fan. Put your black lead on the common and the red one in the fan and wait few seconds. After few seconds it’ll show you some lower single-digit reading (check on your capacitor the fan reading will be written on it).
If the meter’s reading is close to your capacitor’s written reading then the capacitor is fine. If it’s too low or not showing anything then you know what it means, your capacitor is dead.
A similar process can be applied to the single-run capacitor of your furnace blower motor. Since the single run capacitor doesn’t have HERM. You don’t have to worry about which lead of your meter goes into which terminal.
What to do when your meter doesn’t measure microfarad?
If you have an amp meter then just put your meter to the lowest amp number. And measure the current between the HERM and common. Whatever amps you get from the capacitor put it into this formula.
Your Amps reading x 2652 ÷ capacitor voltage = Your Capacitor Microfarad rating.
What to do when the capacitors failed and the ratings are worn off?
When the capacitors failed and the ratings are completely worn off you can look at the rating plate of the outdoor fan motor and as well as the rating plate of the outdoor compressor.
You’ll see the MFD ratings on the compressor or fan rating plate. If the compressor reading plate doesn't have a capacitor size needed. Then you're going to have to look up the model or the part number of that compressor online.
You can just type in the compressor's model number and the word capacitor or you can type in the manufacturer's name and the model number and the word capacitor and then you can find possibly some installation instructions about the capacitor.